|
The Cyborg
PatrickD's Cyborg
All the Lego mini-figure androids are the same. Ho-hum. Big deal.
The cyborg is a creation originally designed by Daniel Wellehan in the mid-1980's. Complete instructions are below. Please note that you will have to permanently destroy two Lego parts to build the cyborg. Build at your own risk.
Step 1: Gather the Pieces
You will need these parts to build a cyborg:
- 1 head-sized piece (I chose a clear piece)
- 1 older torso piece with at least one arm (see note below)
- 1 set of legs
- 1 helmet (I chose clear)
- 1 robot arm
- 1 thick antenna (not the long, thin kind)
- 1 rubber tube which can fit tightly on the antenna
- 1 chest covering (optional)
Please note that I do not claim any responsibility for what you're about to do to your Lego pieces. Go forth at your own risk. I cannot send out any parts required to build the cyborg. I don't know where you can find required pieces either. I will not replace any pieces you break. I will not send out completed cyborgs. Any damage to your Lego (or yourself) is your own responsibility.
 Make sure the torso piece doesn't have ridges in the center (like in the illustration). If there are ridges, you cannot build a cyborg. Lego started putting ridges in the torsos of mini-figures in the early-to-mid-eighties.
Step 2: Assemble the Arm
- Cut the antenna exactly 1.7 cm (or 11/16") from the round end.
- Put the piece you just cut into the robot arm (as shown above).
- Cut a .2 cm (or 1/16") end off the rubber tube.
- If the torso has two arms, rip one off. (It doesn't matter which one...but you can't do both because of limited space.)
Step 3: Insert the Arm
- Insert the arm into the arm hole in the torso.
- Drop the rubber tube ring into the torso.
- Using an antenna or other small tool, move the ring around inside the torso so that it ends up on the end of the cut-off antenna part of the arm. (This is the hardest part of the entire process. Be patient.)
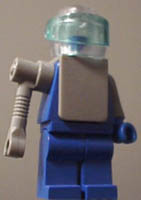
- Rotate the arm around and push the ring up the cut-off antenna until it's snug against the inside wall of the torso. The arm should now be securely in place. (When you get to this point, it should look similar to above.)
Step 4: Finishing Touches
- Finish assembling your cyborg as you would for a normal figure.
- You should note that with the robot arm, not all torso coverings fit over the figure.
- Also note that if you pull on the arm, it will come off and you'll have to go through the whole procedure with the rubber ring again.
- Enjoy your cyborg!
|